Showing posts with label Girlie Grunge Twine. Show all posts

Saturday, March 26, 2016

Denim Pocket Pillow by Donna Salazar

Hello my peeps! Today I'm sharing a SEWING project! I know, right? Who knew that I could sew. I was inspired to do this project by the Soft Touch pillow insert from Fairfield. I felt that maybe I needed yet another denim pillow because I never seem to have enough denim in my life... LOL! 

The pillow insert is 14x14 so I cut two 16x16 pieces of denim. I started by sewing the denim piping along the edge of one side then sewed the Levis® pocket to the center... but offset just a touch because I knew I'd be adding the flower. I pinned the 2 pieces of 16x16 denim together, wrong side out, and sewed around the edge with the foot right on the piping to give it a nice clean edge. I left a hole on the last side that was half the width of the pillow, turned the case inside out, added the pillow insert and sewed the cover shut, again with the foot right on the piping.

I then made the flower pin and bow pin that could be removed (to make washing the pillow easier) and have the step by step instructions for you.

I started by die cutting a whole bunch of roses and leaves from denim and Oly*Fun Rose Gold material using my new Jumbo Rose steel rule die from Spellbinders®. These roses are the next couple sizes up from one of my first dies (and still a very popular die) with Spellbinders® called Rose Creations.  I painted the backs of all of the flowers and leaves with my Girlie Grunge Art Medium from Scrapbook Adhesives by 3L® to stiffen the materials enough to form them.


After the medium was dry I put the Oly*Fun die cuts in my Medallion Em-Bossing folder and ran them through the Platinum machine.


I had some canvas flowers that were perfect for the flower center that I had cut from my Canvas Ribbons from Scrapbook Adhesives by 3L® using my Rose Creations dies. I painted them with Girlie Grunge Art Medium to stiffen them and keep the edges from fraying. I also cut 3 pieces of my Girlie Grunge Twine to use to string all the die cuts together. This was made easier when I dipped the ends of the Girlie Grunge Twine into my Girlie Grunge Art Medium then twisted them together. 


When it dried (after about a minute) the end was stiff like a shoe lace which made it supper easy to thread it through the shank of a vintage button.


I then dipped the ends of both sides of the Girlie Grunge Twine into the Girlie Grunge Art Medium again and twisted to thread through all the flower die cuts.


I started with the canvas flowers...


Then I threaded the smaller denim and Oly*Fun roses with the petals offset then the larger roses.


I trimmed the Girlie Grunge Twine and spread the ends out. I used a Dodz™XL to adhere the ends in place. I used another Dodz™XL on top of 3 leaves that I adhered to the bottom of the rose.


I die cut the larger rose from my Jumbo Rose die with a piece of stiffen2 interlining from Fairfield. I then sewed a pin to the back of it.


I lined up the stiffen2 interlining die cut on the back of the flower and used a heat gun in between the flower and the interlining pressing each petal to the flower as I went to fuse them together. 


I tied a bow with my organza ribbon from my Texture Ribbons pack from Scrapbook Adhesives by 3L® and sewed a pin to the back.


I used a heat gun to make the bow look more girlie grunge.


I added both pins to the pillow and called it done!!! 


Here is a close up of the denim piping on the side of the pillow.


The whole project only took me about 2 hours total!!! Easy peasy!!!


Product used:
Donna Salazar Designs® with Scrapbook Adhesives by 3L®

Spellbinders®

Fairfield
Soft Touch pillow insert
Oly*Fun Craft Sheet Rose Gold
stiffen2 Interlining

Thanks for stopping by!!! Smooches ~D~

Tuesday, March 15, 2016

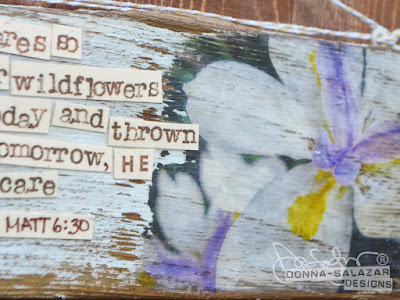
How To Do Image Transfer With Girlie Grunge Art Medium

Hello my peeps! Today I'm sharing a flippin' awesome technique using my new Girlie Grunge Art Medium called Image Transfer. I have been having so much fun experimenting with this product!!! I think this is one of my most favorite projects so far.


I used a photo of some flowers that was printed on matte photo paper and an old wood shingle from a barn that a friend of mine gave to me.

You can double click on the video to go to Youtube so you can get a larger view.


Here are some additional tips for using the Girlie Grunge Art Medium:

I used the Girlie Grunge Art Medium and a couple tiny lace scraps to create the loops that I used to hang this.

I simply dipped the lace directly into the medium then adhered it to the back of the shingle.

After it was on the shingle I added more of the medium to make sure that it had a strong hold.

I leaned the shingle against the container so the back could dry.

I added a bit of the medium to the end of a long strip of my new Girlie Grunge Twine and twisted.

This made the end stiff so it would be easy to thread through the holes.

I went from the outside to the inside on one end then the opposite on the other end.


I tied the ends together... 

...Then I tied a bow... 

... Then I added a touch of medium to the center of the bow to keep the bow from untying.


Product used:
Donna Salazar Designs® with Scrapbook Adhesives by 3L®

Colorbox®
Mix'd Media Inx CHOX - Sparrow

Thanks for stopping by!!! Smooches ~D~

And as promised here are the two winners of the Premier issue of Creative Scrapbooker Magazine. Drumroll please......

Hello GF....you are certainly on a roll with articles in magazines this month. But so well deserved. I'm so excited for you. Of course I would love to be able to have a copy of this Magazine. It is so sad that there are hardly any scrappy magazines in print anymore. I miss them...yes old school, that's me. LOL. So Thanks again from Prescott, Arizona Hugs
Congratulations and Happy Birthday! I love the special gifts you received - thanks for sharing. I miss scrapbooking magazines so much!
- Erika from California
So... If either of these posts are from you, CONGRATULATIONS!!! You can send me an e-mail with your name and mailing address to donna.e.salazar@gmail.com and I'll get your prize in the mail.

Thursday, February 11, 2016

Mixed Media Scripture Journal Page by Tracey Sabella

Hi everyone. It's Tracey here to share a new page for my Scripture journal. I simply adore working with Donna's Scrapbook Adhesives by 3L® Denim Art Journal. The extra thick chipboard pages are a dream to work with and hold up perfectly for mixed media techniques. I feature Donna's new Scrapbook Adhesives by 3L® Girlie Grunge Twine and Gauze along with her new wine and silver Pigment Powders.

"Be of Good Cheer"

Tips and Techniques
I created these twine flowers using Donna's new navy and aqua Girlie Grunge Twine. I'm working on a video tutorial demonstrating how to make these sweet flowers, so stay tuned! I sprinkled Donna's Clearsnap Mixed Berries Twinkle Dust Glitter onto Scrapbook Adhesives by 3L® ~ DODZ™ - 3D to create these sparkling centers. The twine flowers are layered onto flowers created with Donna's Scrapbook Adhesives by 3L® Girlie Grunge Gauze. Donna's Scrapbook Adhesives by 3L® Dodz™ XL are perfect to adhere them to the page.

The sentiment is stamped onto white cardstock with Donna's Clearsnap black Mix'ed Media Inx, then edged with a blend of Donna's Indigo and Schoolhouse Mix'd Media Inx.

I adore creating my own paint with Donna's Pigment Powders and mixed up a custom aqua color by combining her blue and gold powders to brush over the gauze and resin flowers.

This metal feather charm is brushed with white gesso, then dry brushed with more of my pigment powder paint. I added silver pigment powder to the aqua to achieve this darker blue.

I adhered a few strips of a dictionary page to the background and brushed the entire page with white gesso.

I cut a couple odd shaped pieces from Donna's Girlie Grunge Gauze, which I spritzed with water and distressed. When dry I adhered it to the page for added texture. I lightly brushed with my aqua Pigment Powder "paint", then dry brushed with white gesso to soften and to highlight the textures.

Here's another shot of the gauze. 

I stenciled texture paste across the right side of the page. While it was drying, I mixed up a blend of Donna's Clearsnap Mixed Berries and Holly Berries Smooch Spritz along with her Wine and Silver Pigment Powders to create this rich wine color. Once the molding paste was dry, I spritzed with water, then brushed with the wine water color mixture allowing the color to spread and pool. While wet, I sprinkled and rubbed with blue pigment powder.

I also mixed together a blend of Sea Breeze Smooch Spritz and silver Pigment Powders which I applied at the edges of the wine color, again spritzing with water, to move and create lovely color variations as it dried.

On the left side of the page, I applied these same colors, but used a palette knife to scrape the color across the corner, spritzing lightly with water as I applied the color.

I also randomly splashed a little of the color onto the white center of the page.

I hope you've been inspired to grab your Girlie Grunge products
and mix them together to create a mixed media project.

~ Blessings ~


Donna Salazar Designs Products

** NEW - Pigment Powder - Wine, Silver
** NEW - Girlie Grunge Twine - Navy, Aqua
** NEW - Girlie Grunge Gauze


Partner Products

For a complete product list, please stop by my blog: Garden of Grace.