

Hello my peeps! Welcome to day 4 of the Spellbinders Paper Arts® CHA Roundup: Sneak Peek and Giveaway blog hop! I am so excited to share this Girlie Grunge mixed media canvas that I've made with just a few of my new products that will be released at the Winter 2016 CHA Mega Trade Show!
And what is a blog hop without a chance to win awesome stuff? Spellbinders is generously giving away ALL three of the new products that I've revealed today!!!
Contest Has Ended.
Official Contest Rules can be found HERE And for MORE chances to win you can visit Jennifer Ingles Blog. Questions? ContestQuestions@Spellbinders.us (No entries will be accepted at this email address)
I am an inky-painty-glitzy-grungy kind of artist but what I love about the Spellbinders products is how amazingly versatile they are. Whether you like clean lines or think that "Messy hands are happy hands", if you are just learning to papercraft or if you're an advanced artist, I believe that my Spellbinders die templates, stamps and embossing folders can fit into your personal style!
I'm going to start by showing you how to use my NEW "Big Blossom" die S4-573 (die on the left) with the largest die from my existing "Bitty Blossoms" die set S5-086 (die on the right) to create the flower in the close up photo at the top of this post.

I began by cupping each petal on both die cuts with a dry embossing stylus and a foam pad.

I folded a couple pearl flower stamens in half, wrapped the stems with Crafty Power Tape, then trimmed off the folded ends so the height of the stamens was about the height of the flower petals of the large "Bitty Blossom".

I used the adhesive on the stamens to help me start rolling the "Bitty Blossom" with the petals curled inward.

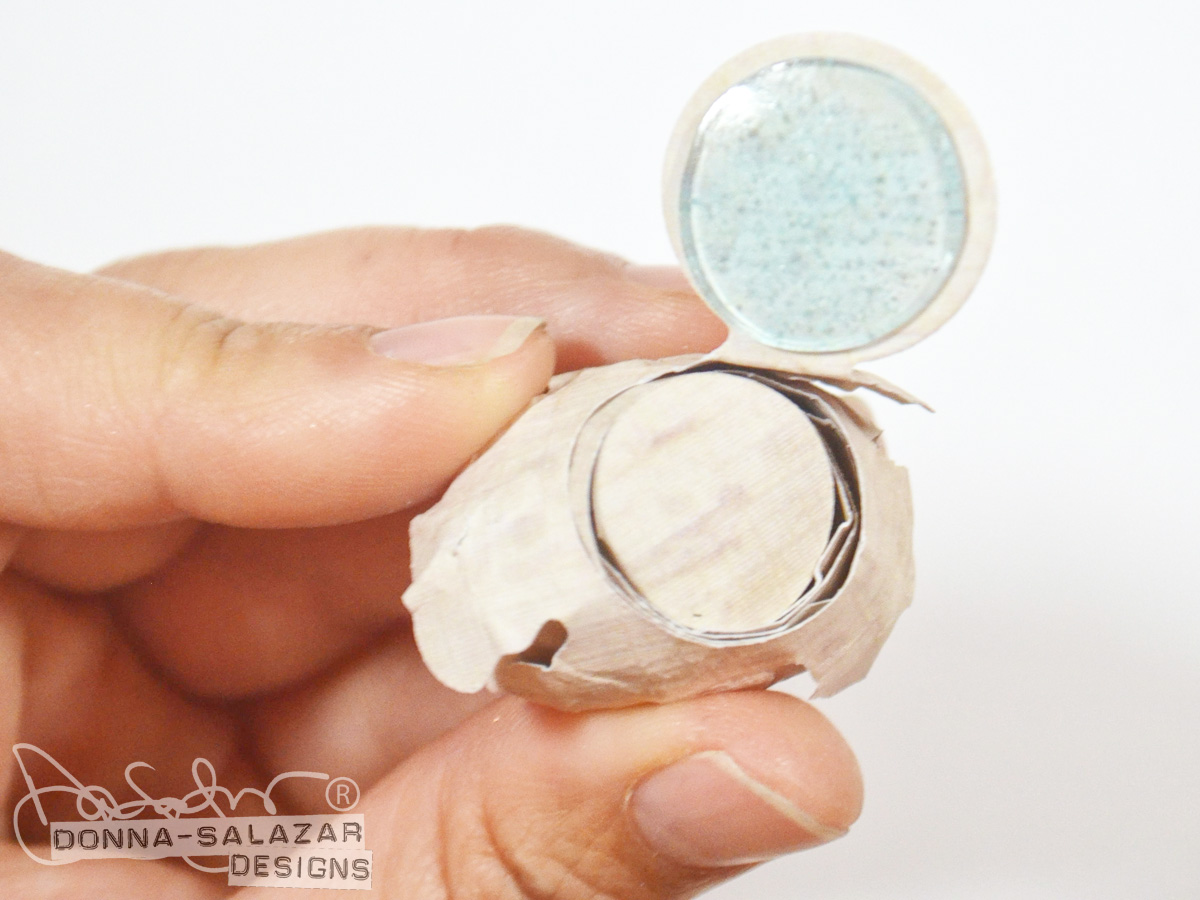
Once I reached the end the flower looked like the image below. I used a Dodz™3D to adhere the circle tab to the bottom of the flower to secure everything in place.

I used a Dodz™Medium on the inside of the "Big Blossom" die cut on the end that is pointed.

I adhered this end to the outside of the "Bitty Blossom" then continued rolling the flower.

When I got to the end I added a Dodz™XL to the inside circle tab and folded it over to secure the two die cut flowers together.
I used a dry embossing stylus to curl the petals of the "Big Blossom" die cut outward and left the petals of the "Bitty Blossom" curling inward.

And here is the finished flower!

In the photo below you can see my NEW "Cascading Butterflies" die S5-242 that not only gives you 9 butterflies in one pass... but you also get the frame of the butterflies!!!You can use the frame for backgrounds (like I've done on this project) or on layouts or cards... you can even die cut photos and sentiments to fit inside the butterfly shapes! The possibilities are endless!
I die cut 2 pieces of pattern paper at once in the new "Platinum" machine from Spellbinders.

I decoupaged the two butterfly frames to an 8x10 canvas that I had already decoupaged with book pages using my new Girlie Grunge Art Medium from Scrapbook Adhesives by 3L®.

I painted over the entire canvas with light blue acrylic paint...

While the paint was still wet I added brown acrylic paint around the edges...

While the paint was still slightly tacky I used a baby wipe to begin to remove some of the paint to reveal the text from the book pages and the texture of the butterflies.

The photo below is what the painted background looked like at this point.

I added a layer of white acrylic paint over the entire canvas.

I then used a baby wipe to remove the paint where I wanted the background to show through. You can take off as much or as little as you want.

I added a bit of white paint smears around the edges as well as over the background where I wanted the texture of the butterflies to show more.

I randomly added paint smears to the butterflies and set them aside to dry. I knew I wouldn't be using all of the butterflies but I'll definitely use painty smeared butterflies again on another project.

In the photo below I've used my NEW stamp/die combo set "Flower Bouquet" SDS-020. This stamp/die combo also comes with a little flower and a vine die that match the image. I stamped and heat embossed the image with my Mix'd Media Inx and embossing powder in Truffle from Colorbox... having an embossed image helps when painting in the small details later.

I then used the die that perfectly outlines the stamped image (No fussy cutting needed!). I taped down the die so it wouldn't shift when I die cut it.

The photo below shows the stamped and die cut image as well as the flower and vine die that also come with this set. I was able to die cut 3 layers of white card stock in one pass in the Platinum machine.

I mixed my Pigment Powders from Scrapbook Adhesives by 3L® in Gold and Blue with my new Girlie Grunge Art Medium and painted the die cuts to create these sparkly green vines and flower backgrounds.

I used the same mixture to paint in the leaves and greenery on the stamped, embossed and die cut "Flower Bouquet" image.

I used my new Wine colored Pigment Powder from Scrapbook Adhesives by 3L® with my Girlie Grunge Art Medium to add color to the flowers in the "Flower Bouquet" image.

I used the same mixture to paint the front of the butterflies then I folded them in half.

When I opened the butterflies each one had a cool and unique pattern.

I placed the die cut elements on the canvas to find the placement I wanted then I decoupaged the ends of the vines and used Dodz™ to adhere the rest of the elements.

I used the "Central Park" stencil masks from Hazel & Ruby with a watercolor pencil and alcohol pen to add the word SOAR to the top of the canvas.

I used tiny letter stamps with my Mix'd Media Inx CHOX to write out this bible verse then adhered the words to the canvas using my Girlie Grunge Art Medium. In case you are wondering... my word for 2016 is SOAR which is why I made this canvas. :)

And here is the finished canvas!

Below is a close up of the "Flower Bouquet" stamped, embossed, die cut and painted image.

In the photo below you can see a bit of the background texture that I was able to achieve with the "Cascading Butterflies" as well as how some of the painted butterflies turned out.

Product used:
NEW Big Blossom S4-573
NEW Cascading Butterflies S5-242
NEW Flower Bouquet SDS-020
Mix'd Media Inx & Embossing Powder - Truffle
Mix'd Media Inx CHOX - Sparrow
Hazel & Ruby - Central Park Stencil/Masks
Liquitex - Basics Paint - Titanium White, Light Blue, Burnt Sienna
Hazel & Ruby - Central Park Stencil/Masks
Liquitex - Basics Paint - Titanium White, Light Blue, Burnt Sienna
Thanks for stopping by!!! Smooches ~D~


Loving all the layers and dimension here Donna. Congratulations on the new releases!!
ReplyDeleteThanks Seth! :)
DeleteI love the leaves, butterflies and beautiful flowers!
DeleteAwesome. Love the flowers and all the great dimension you have on this canvas. Those butterflies are so cool. Can't wait to get those.
ReplyDeleteThanks Barbara! :)
DeleteBeautiful projects love the new dies. thanks for sharing
ReplyDeleteThanks Anita! :)
DeleteGreat job.. the butterflies are great!
ReplyDeleteinteresting!
ReplyDeleteWOUW what an awesome canvas here. I absolut love this project and I love the butterflies and the flowers and also the stamps is perfect for mixed media projects. Biiig congrats with this amazing release here Donna, everything is just perfect.
ReplyDeleteI love the texture created by the die cut butterflies - and those flowers! Gorgeous!
ReplyDeleteCONGRATULATIONS on your BEAUTIFUL stamp and DELGHTFUL dies Donna - SO MUCH to LOVE!!!
ReplyDeleteLOVE your canvas, the butterfly outlines make a wonderful background with texture & interest, the flowers & butterflies GORGEOUS dimension!!!
THANK YOU for sharing your CREATIVE INSPIRATION :)
This is gorgeous! Absolutely gorgeous!
ReplyDeleteSuch a Wonderful project and tutorial. The time can not move fast enough, so that I will be able to purchase the Die & Stamp set.
ReplyDeleteI've had bitty blossoms forever...I know that I Need not want the cascading butterflies. I love watching the videos during CHA;I hate waiting until I can buy the items.
ReplyDeleteI Love the new dies. Your canvas is stunning. Love all the texture and dimension.
ReplyDeleteYou have created a beautiful canvas! Love all of the colors and dimension! Especially love those butterflies! Congratulations on the new dies. Just love them!
ReplyDeleteThis is truly a labor of love. Beautiful piece.
ReplyDeleteWow! What a masterpiece! I like use of all the textures and dimension. It is inspiring.
ReplyDeleteI am very excited about the Cascading Butterflies die AND the Flower Bouquet die and stamp set! Your project is beautiful, and I look forward to the release of both....
ReplyDeleteI love Bitty Blossoms, so the Big Blossom will be a great addition! That center you made is extra cool!!
ReplyDeleteQuestion - do the cascading butterfly dies cut out the connected outlines/frames AND the loose butterflies, or did you fussy-cut the frames?
The butterfly die cuts 9 butterflies as well as the frame... no fussy cutting needed!!! :)
DeleteWow!!! A masterpiece !!! I love this!! Thank you for sharing!
ReplyDeletelove the butterflies. i hope they never go out of style they are just so versatile.
ReplyDeleteLove the project and the detail! Simply gorgeous!
ReplyDeleteBeautiful project. Thanks for sharing.
ReplyDeleteJudith Taylor
Great job all around (dies, stamps, techniques, etc.)
ReplyDeleteOh my goodness! This is the first time I've seen your work and I must say...It is absolutely awesome, totally creative and a real work of art! I am so impessed and what a wonderful way to start my day! Thank you!
ReplyDeleteBeautiful wall hanging. love the texture and detail on it. great job! thanks for sharing
ReplyDeleteAbsolutely gorgeous. Love what you did with these dies and creative textures.
ReplyDeleteLove what you did. I can learn a lot from you. Thank you.
ReplyDeleteDonna,
ReplyDeleteI love this project! Can't wait to get my hands on these dies! Thank you!!
Beautiful canvas.
ReplyDeleteLove the butterflies.
the flower die will make it easier to make beautiful flowers.
thanks for sharing.
what a beautiful canvas - I love your word for 2016 - it is a good one - thanks for sharing
ReplyDeleteBarb Housner
Stunning canvas! Love it; love the bible verse.
ReplyDeleteWow, Donna! What a GORGEOUS piece of art work!! I especially love your use of a Bible verse, but that certainly isn't the only eye-catching part of the piece of art! I love butterflies and your die will go on my "want" list. The flowers are quite striking as well. Thank you so much for participating in the Blog Hop! It has been a blast!
ReplyDeleteBeautiful canvas!!! LOVE the flower dies but the Butterfly dies have my heart!! LOVELOVELOVE! TFS!
ReplyDeleteAbsolutely beautiful!
ReplyDelete~Steff~
What a gorgeous project! I love the Cascading Butterflies die!
ReplyDeleteLovely canvas! You've certainly used the Butterfly die well, using the frame and also the butterflies. As I love butterflies and flowers I shall have to look out for your dies. Thanks for the tutorial.
ReplyDeleteThis is absolutely lovely and thanks for the tutorial. I think that I have a die similar to this flower die, so will have to give it a try. Thanks for sharing.
ReplyDeleteLinda
This is absolutely lovely and thanks for the tutorial. I think that I have a die similar to this flower die, so will have to give it a try. Thanks for sharing.
ReplyDeleteLinda
Beautiful canvas! I like how you incorporated all of today's releases. I hadn't thought of adding stamens to the roll-up flowers, thanks for the tip!
ReplyDeleteQuite beautiful. I'd love to try die-cuts with stamps....a marvellous (and so perfect) effect.
ReplyDeleteOh my....amazing!
ReplyDeleteBeautiful project Donna! I love your dimensional flower! TFS
ReplyDeleteI love the rolled flowers. These really elevate your cards to the next level! Thanks Donna!
ReplyDeleteA beautiful project and so creative!
ReplyDeletewowzers that is incredible!!!
ReplyDeleteI love what you have designed and created, Donna
ReplyDeleteWow, I have to admit...I've never been a fan of mixed media, but after seeing your canvas I may been rethinking my position on it. You Canvas is beautifully beyond Gorgeous. I so love all your new dies, especially the big roll flower die. I so look forward to seeing your next set on awesome dies.
ReplyDeleteI am definitely going to have to get the flowers stamp and die set. Love it. TFS. Bity Blossoms are a real favorite of mine, Donna.
ReplyDeleteHi Donna, This is a fabulous tutorial, love every single element of your canvas, and the large blossoms die is brilliant !! and it elongates the bitty blossoms beautifully to produce a gorgeous, gorgeous full flower. Your new dies are beautiful.
ReplyDeleteLots of love from Patricia xx
Love your designs and your canvas is just fantastic.
ReplyDeleteI do LOVE your new dies and stamp!! Not sure I could pick one I like the most, they are all beautiful! Lovely tutorial too, thanks!
ReplyDeletelove what you have done here, the canvas and the flower tutorial both great.
ReplyDeleteWow. I'm loving the new products, and seeing what you have done has given me some great ideas. Congratulations.
ReplyDeleteThis is just amazing!!
ReplyDeleteLove the butterfly die. What the heck, I loved it all. Thanks so much for the tutorial. I will have to try the messy project. Looks like so much fun.
ReplyDeleteSo gorgeous!!! Love the rolled flower die!!
ReplyDelete<3 J
jwoolbright at gmail dot com
HerPeacefulGarden.blogspot.com
Your project is absolutely beautiful. Love the butterflies.
ReplyDeleteYour project is absolutely beautiful. Love the butterflies.
ReplyDeleteAwesome work, well done
ReplyDeletewow !!! awsome !!! I really love butterflies and big blossom - thanks for sharing your inspiration !!!
ReplyDeleteThis is AWESOME.
ReplyDeleteI am so excited about these dies! I just recently got the Bitty Blossoms die set and have been playing with them and love them and now I will be able to make them even bigger. I haven't been able to decide on butterflies yet so this will make that an easy choice.
ReplyDeleteOoohhhh, wondering if I whine and beg and pout if I will get picked????Ok, that's just undignified for a 61 year old but I'm tempted. I LOVE these new products from you - they are just right up my alley! The finished canvas is lovely - like how you made all the elements stand out so well. Thanks for sharing such a nice tutorial. (and I hope you know how hard it is to type with all your fingers crossed!)
ReplyDeleteGorgeous projects and new products. Congrats
ReplyDeleteI LOVE all of this! The canvas is beautiful!!
ReplyDeleteBeautiful artistic creation Donna!
ReplyDeleteGreat project thank you for sharing. xx
ReplyDeleteSuch a very pretty project. Thanks for sharing your techniques for putting it all together.I can't wait to see all of the dies at once.
ReplyDeleteI admire the creativity you have. Emilia Fregoso.
ReplyDeleteBeautiful. How long or should you dry the background before adding flowers and butterflies?
ReplyDeleteWow what a beautiful creation. I love the techniques. Peggy C
ReplyDeleteDonna, I love mixed media and your project using dies is fabulous. The new butterflies are one of my favorite releases. Can't wait! I appreciate the steps you took to create such a lovely project.
ReplyDeleteLove the butterflies and and the flowers too!!!
ReplyDeleteThey are all fantastic and your creations are beautiful. Of course they are-you designed them!
ReplyDeleteOh, Donna, WOW ... nothing else to say except love, love, love this! Can't wait to be able to get the larger blossom die to go with the bitty one and the awesome butterflies! Thank you for the instructions ... Wonderful :)
ReplyDeleteOh wow! I'm getting the flower die for sure when that comes out! I'm in love with it? Beautiful projects!
ReplyDeleteLove the way you outlined each item. Great instructions and wonderful project. Thanks
ReplyDeleteBeautiful!!!! Love how the different elements, the butterflies and the flowers come together. Great easy to follow tutorial. Thank you!
ReplyDeleteOh wow! I love each and every one of your dies! And your project is so beautiful!
ReplyDeleteAmazing piece of art. Inspiring how you let your creativity SOAR to create this wonderful piece. I love the cascading butterfly die. It's definitely on my wish list.
ReplyDeleteI love the butterflies and it looks like a lot of fun to use all the product you did today.
ReplyDeleteI love the butterflies and it looks like a lot of fun to use all the product you did today.
ReplyDeleteLove the entire canvas, beautiful piece, Donna!
ReplyDeleteOh yeah !! you know its been a good day when you finish a project with as much ink and paint on you as the final project. :-) great job!
ReplyDeleteVery pretty canvas. Thank you for sharing how you created this canvas. I can always learn something new.
ReplyDeleteSuch beautiful dimension, texture, and beauty! Congratulations on your newest releases!!
ReplyDeleteBeautiful canvas, I love the big blossoms and Cascading Butterflies!
ReplyDeleteWow that canvas is so much fun! Such nice layers and the butterflies look great on it. Congrats on your release. You also did a great job on all the photos especially considering there is a lot of really close up shots. Nice to see a project by you.
ReplyDeleteHello Donna, big fan of your work. Loving the new collection. Project's are awesome too. tfs
ReplyDeleteBeautiful work!
ReplyDeleteLots and lots of work, love your bible verse and the new larger flower die.
ReplyDeleteWas the question on blog for machine used? Big Shot and Cut and Boss.
Lots and lots of work, love your bible verse and the new larger flower die.
ReplyDeleteWas the question on blog for machine used? Big Shot and Cut and Boss.
What a lovely piece. Great texture and love the layers!
ReplyDeleteWhat a lovely piece. Great texture and love the layers!
ReplyDeleteI want all of your new dies! They all go together so well. All are my favorite things, butterflies, flowers and stamp and die sets. Hope I can get some soon!
ReplyDeleteLove, love, love all your new dies Donna!!!! I really like the addition of the die and stamp combo. Stamps add that extra punch to the die cut. Especially on flower and foilage die sets. Especially the spellbinder dies as they add that embossing detail as well.
ReplyDeleteGreat canvas! I love the butterflies they add fantastic texture and layering! Thank You for sharing it!
ReplyDeletelove your flower! The canvas is wonderful! Thanks for sharing the tips!
ReplyDeleteFlowers and butterflies are my weakness, love the canvas thanks for your inspiration.
ReplyDeleteVery unique and fun dies and stamp set. Love the layers of the canvas and the how you did the quote. beautiful work.
ReplyDeleteSuch a fun project! Really enjoy seeing your work.
ReplyDeleteShellee
What beautiful results with the butterflies and flower stamp and dies.
ReplyDeleteVery pretty. Love all the texture.
ReplyDeleteLove that there is no fussy cutting the roses. Beautiful butterflies dies. Lots of possibilities for each one.
ReplyDeleteLove the added dimension.
ReplyDeleteLove it all....so many great new products.
ReplyDeleteLove it all....so many great new products.
ReplyDeletelove those 3D flower dies! This piece is beautiful- love all of the dimension!
ReplyDeleteLove all the bits, the possibilities are endless!
ReplyDeleteSimple great tutorial. thanks
ReplyDeleteYour project is simply stunning Donna!
ReplyDeleteWonderful project. Thanks for a chance to win! Happy New Year!
ReplyDelete