Welcome to the Third Annual Handmade Holidays blog hop!!
The best crafters, designers, and makers have come together to create and share a series of thoughtful, handmade gifts for the holidays during this 3 day blog hop. Our goal is to inspire you to create something from the heart this holiday season as well as share how to use our products in fun, innovative ways. We intend this hop to serve as a resource to you for this holiday season and for years to come.
Hop along to each blog in the list. Each day, from November 1 through November 3, 2013, we’ll be posting a brand new list of blogs to hop to. Comment on each blog, share your favorite posts over social media, and then use the Rafflecopter widget at the bottom of each post to enter to win the Grand Prize, a gift basket filled with crafty swag from the companies on the hop! We’re ready to inspire, share, and create – are you ready to hop?
Today I'm using my Fairydust Glitter to create some Christmas ornaments.
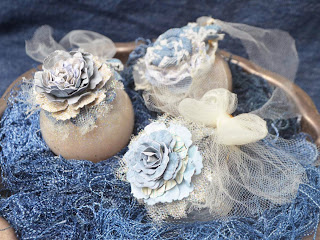
Here are some photos of each ornament. These first two were made by using a liquid adhesive inside a glass bulb then I shook some Pralines & Cream Fairydust glitter inside.
On the first bulb I used my Grand Peony Creations and Rose Creations flower dies from Spellbinders.
On the ornament below I used denim from the Blue Gene Baby Etsy shop.
Here are the instructions for how I made the last ornament.
I used Crafty Power Tape from Scrapbook Adhesives by 3L to create the design.
After removing the backing, I sprinkled Fairydust Glitter over the adhesive and rubbed it in until it wasn't sticky anymore.
Cut several pieces of tulle into circles.
I used fringe scissors to cut the edges.
I adhered the tulle layers together with Fabri-Tac.
I adhered a flower made with several of my flower dies from Spellbinders to the tulle circles
with Fabri-Tac.
I used Glue Gloss on the edges of the Tulle.
I sprinkled Fairydust Glitter over the Glue Gloss.
I adhered the flower to the bulb using 3D Dodz from Scrapbook Adhesives by 3L.
I tied a tulle bow using the Bow-it-All and I added 3D Dodz so I can adhere it to the ornament.
I used a heat gun to make the tulle all wonky.
I finished by adhering the bow to the ornament.
Special tip: When putting glitter back in the bottle make sure you take the lid off over a piece of paper to catch the glitter stuck in the threads.
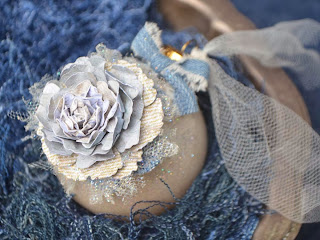
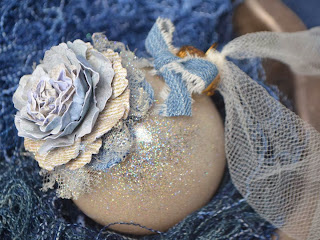
Here are close ups of the finished ornament:
Here are the blogs on today's blog hop:
Clearsnap http://blog.clearsnap.com
Craft Attitude http://www.jonathanfongstyle.com/blog/
Smoothfoam http://www.smoothfoam.com/blog/
Donna Salazar Designs You are here
Walnut Hollow http://walnuthollowcrafts.wordpress.com/
100 Proof Press http://www.100proofpress.com/_blog/Blog
Graphic45 http://g45papers.typepad.com/
ICE Resin http://iceresin.com/icequeen/
Stampendous http://stampendousblog.wordpress.com/
Sizzix – Eileen Hull Designs http://eileenhull.blogspot.com/
Donna Salazar Designs - Mistra Hoolahan http://mistrabutterfly.blogspot.com/
100 Proof Press – Elise Durenburger http://mamacowcreations.blogspot.com/
ICE Resin – Lexi Grenzer http://lexigrenzer.blogspot.com/
Graphic 45 – Rhea Freitag http://starrgazercreates.blogspot.com/
Clearsnap – Debbie Cole http://www.debbiecole.com
Smoothfoam – Vicki O’Dell http://www.vickiodell.com
100 Proof Press – Teresa Abajo http://thetamarisk.blogspot.com/
Sizzix – Amy Bowerman http://pluckingdaisies.com/
ICE Resin – Jo DeSerio Jones http://shopjomama.blogspot.com/
Smoothfoam – Lisa Fulmer http://lisalizalou.blogspot.com/
I welcome you to visit this blog throughout the month of November for my
"Christmas Cards of 2013"
I'll be sharing a handmade Christmas card tutorial every week on my "Wednesday Webisodes" show and each week I'll be sharing a different technique using Clearsnap products.
Thanks for stopping by! Smooches ~D~
"Christmas Cards of 2013"
I'll be sharing a handmade Christmas card tutorial every week on my "Wednesday Webisodes" show and each week I'll be sharing a different technique using Clearsnap products.
Thanks for stopping by! Smooches ~D~
Visit the Girlie Grunge site for challenges, giveaways, tutorials, e-Classes, etc... HERE
You can follow me on Twitter: HERE
You can Like the Donna Salazar Designs Facebook page: HERE and the
Distrezz-it-All Facebook page: HERE
Distrezz-it-All Facebook page: HERE
You can subscribe to my YouTube channel: HERE
I'll be drawing a winner from the subscribers on my YouTube channel for the prize above in early November.
AND... don't forget to FOLLOW THIS BLOG! Just click on one of the buttons under the Subscribe heading to the right.
I'll be drawing a winner from the subscribers on my YouTube channel for the prize above in early November.
AND... don't forget to FOLLOW THIS BLOG! Just click on one of the buttons under the Subscribe heading to the right.
a Rafflecopter giveaway


Wow Donna!!! Your ornaments look so hard to do but the tutorials show how easy it was. Thanks so much for inspiring.
ReplyDeleteDELIGHTFUL - thank you for the tutorial and inspiration!!!
ReplyDeleteLooking forward to hopping along :)
... a little sad that only open to US residents though.
What a fun and easy handmade Christmas ornament. I will be making these to place on top of each gift that I will be giving to my family this year. Thanks for the quick and easy ideas, love your peony die my favorite.
ReplyDeleteI love the ornaments, i already have the fairy dust, will go get a globe today, thank you,
ReplyDeleteLove the fun tutorial.
ReplyDeletewow! These are all so beautiful. thanks so much for the tutorial!
ReplyDeleteThe ornaments are beautiful. thanks for sharing detailed descriptions on making them.
ReplyDeleteHello!
ReplyDeleteBeautiful project! Thank you for the great tutorial! Wishing you a happy day!
Hugs,
Barbara Diane
WOW! These ornaments are absolutely gorgeous!! TFS!
ReplyDeleteThis is gorgeous Donna! I love the denim and tulle flower all pretty and glittery. I must say your fairy dust glitter is quickly becoming my new favorite...it makes me feel magical whenever I sprinkle it in a project :)
ReplyDeleteAmy*
Thanks for sharing, Donna--great project idea!
ReplyDeleteI love this! Thanks for sharing and thanks for the blog hop!
ReplyDeleteI love making ornaments every year!!! This is awesome!!!!
ReplyDeleteDonna, Your Christmas Ornament is darling! I love the flower, glitter and tulle bow. Of course I love the denim but one could make any color of flower they wish, including red, if they are a traditional holiday guy or gal. Such a cute idea. Thanks for your sweet ideas!
ReplyDeleteSo Beautiful!!!
ReplyDeleteBEAUTIFUL! Can see a tree decorated with all the glitter sparkling!
ReplyDeleteI loved the glittery, fairy dust ornaments. Fairy dust is certainly the king of glitters. Lovely.
ReplyDeleteGorgeous Christmas ornaments! Will have to try this out!
ReplyDeleteBeautiful ornament Donna. I love all the glitter.
ReplyDeletebeautiful ornaments.
ReplyDeleteYour ornaments are so pretty!
ReplyDeleteSo beautiful!
ReplyDeleteAngi Mullis dj2isme@aol.com
Will make a cute gift for friends
ReplyDeleteI just love this ornament! Thanks for a great tutorial!
ReplyDeleteBeautiful ornaments, I especially liked the one you showed us step by step! Awesome work, would love to try this too. I can't do the rafflecopter giveaway because I am not on facebook but I can try to figure out how to subscribe to youtube-do you need to be on Facebook for that too? Thanks for sharing.
ReplyDeleteKatie B.
Such pretty ornaments that would be great co-worker gifts! Thanks for sharing.
ReplyDeleteThis is so pretty and you
ReplyDeletemade it look so easy to
make! Thanks.
Carla from Utah
Those look like beautiful ornaments.
ReplyDeleteOhh Donna these are gorgeous. I'm doing all handmade for Christmas this year-I will certainly give this a try.
ReplyDeleteGorgeous!! Love these ornaments to bits!!!
ReplyDeleteLovely ornament!!
ReplyDeleteHow lovely of you to have a drawing of your YouTube followers, which I am one of: JanisinIdaho. I also am a brand-new follower of yours on Blog Lovin: Janis.
<3 J
Donna, you are so creative and inspirational! Thanks for sharing with all of us.
ReplyDeleteWay cool! Thanks for the great tutorial.
ReplyDeleteThis is breathtaking design. I make an ornament for each family member each year, you have provided the perfect inspiration. Thank you for sharing it.
ReplyDeleteThese handmade ornaments are awesome. I have some empty ones and I never knew what to do with them. I have to try and do this. I never knew they had that kind of tape to put on the outside to add the sparkle. Thank you so much for sharing this wonderful project. Saved for me to try. Thank you so much for showing us how. I'm just learning so much from seeing what others are making.
ReplyDeleteLOVE the ornament!
ReplyDeleteWonderful and romantic, perfect as a keepsake gift for a baby's first Christmas. Just love it.
ReplyDeleteAs always, I love what you made. We seem to share the same style.
ReplyDeleteGorgeous ornaments - love the flowers. I follow you on Facebook and YouTube.
ReplyDelete.
isoscia at aol dot com
these are so pretty! t.igo
ReplyDeleteI am so going to try these - I just love the glitter on the inside and the flowers are scrumptious!!!!
ReplyDeleteBeautiful ornament! Love the flower with the tulle behind it and using the tape and glitter to make a ribbon effect, fantastic.
ReplyDeleteI love the way you think outside the box as you use the different crafting tools...thank you for a new way to use my stencils!!!!
ReplyDelete